 Search
 Account
 Discord


- Snowtel 01
- Ice Block
- Raised Ice Block
- Wooden Box
- Magenta Barrel
- Spruce
- Bush
Brawl Stars Afterpiece Arena Guide: Introduction
Brawl Stars Afterpiece Arena is a well-balanced, symmetrical map that mixes long-range lanes with close-quarters chokepoints, allowing various brawlers and strategies to shine. The open side lanes favor ranged control, while the tight, central corridor is ideal for tanks and assassins. Scattered cover and bushes enable ambushes and require constant scouting. Teams must adapt fluidly, rotate between lanes, and hold key positions to control the pace of the match.
Brawl Stars Afterpiece Arena Guide: Map Layout
| Central Lane |
|---|
 The most contested area, the central lane offers wide sightlines but little cover. Ideal for long-range brawlers, it allows teams to control rotations but requires constant support due to its vulnerability. |
| Side Corridors |
|---|
 These tighter, cover-heavy lanes support close-range brawlers and flanking plays. Bushes and walls provide stealth and protection, making them effective for ambushes or defending against mid threats. |
| Destructible Terrain |
|---|
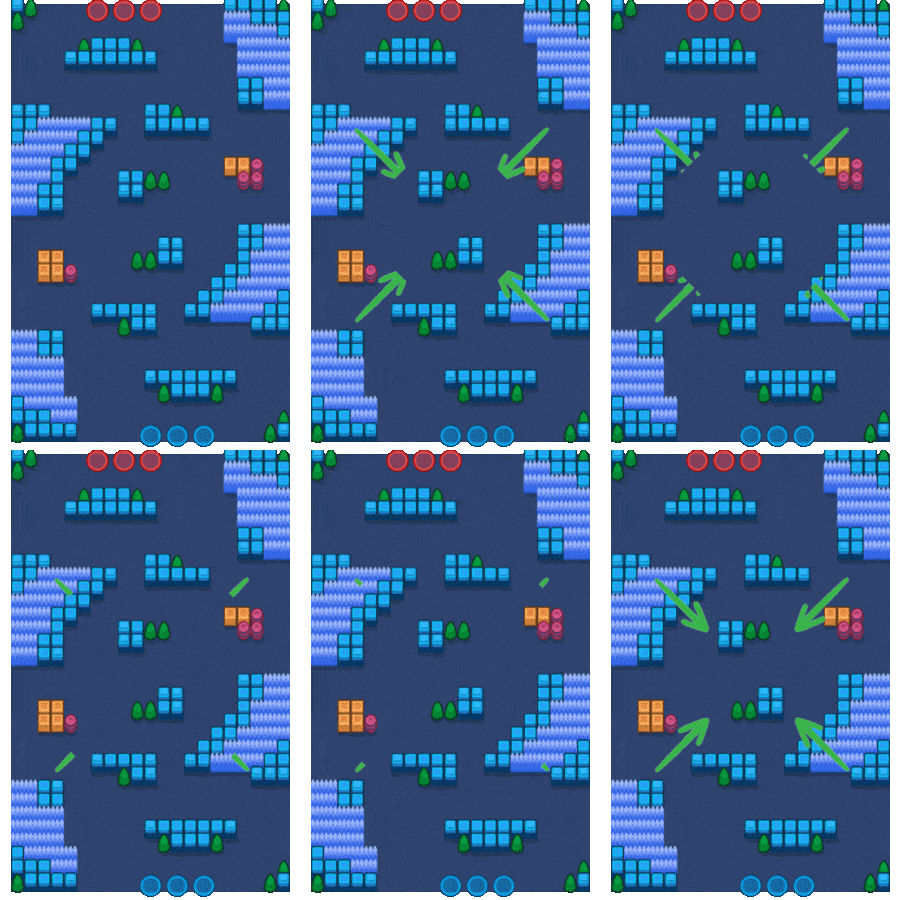 Cover around mid can be broken to alter lane dynamics. Removing obstacles increases risk for exposed brawlers. Spawn-area walls provide fallback defense and opportunities to reset when pressured. |
Brawl Stars Afterpiece Arena Guide: Best Brawlers
Brawl Stars Afterpiece Arena’s varied layout allows different types of brawlers to excel depending on their role and positioning. The map’s mix of open sightlines, tight corridors, and scattered cover creates opportunities for both long-range poke strategies and close-quarters brawls. Choosing the right brawlers for each section of the map is key to gaining control and adapting to the shifting flow of battle.

Belle
Controls sightlines in mid, applying pressure from afar; excels at softening enemies before they can push. Must avoid side flanks.
- Roles: Longe Range Brawler
- Win Rate: 56.2%

Piper
Uses high damage and range to dominate open mid lanes. Requires careful positioning to stay safe from ambushes.
- Roles: Longe Range Brawler
- Win Rate: 54.8%

Byron
Deals chip damage while supporting allies with healing; strong mid-lane presence with utility value.
- Roles: Longe Range Brawler
- Win Rate: 52.5%

Ash
Pushes through side corridors aggressively, thrives in close combat, and can hold chokepoints to break defenses.
- Roles: Tank Brawler
- Win Rate: 55.9%

Rosa
Uses bushes and cover in side lanes for ambushes; durable and effective at controlling tight zones.
- Roles: Tank Brawler
- Win Rate: 57.4%

Bull
Excels in narrow corridors for rushing enemies; thrives when closing gaps and creating frontline pressure.
- Roles: Tank Brawler
- Win Rate: 53.6%

Leon
Sneaks through bushes to assassinate vulnerable enemies; thrives on map knowledge and stealth.
- Roles: Assassin
- Win Rate: 55.1%

Crow
Applies poison pressure from side flanks and finishes low-health enemies; good at scouting and weakening grouped foes.
- Roles: Assassin
- Win Rate: 54.0%

Fang
Uses burst combos to dive into backlines; effective at punishing overextending enemies or flanking mid-lane sharpshooters.
- Roles: Assassin
- Win Rate: 56.6%

Emz
Zones out opponents in mid with wide-radius attacks; strong for holding territory and supporting team pushes.
- Roles: Control Brawler
- Win Rate: 57.0%

Barley
Lobs shots over walls to deny area access; ideal for locking down chokepoints and forcing enemy repositioning.
- Roles: Control Brawler
- Win Rate: 58.3%

Lou
Slows enemies and blocks paths with super; excels at disrupting advances and holding the center or key bush spots.
- Roles: Control Brawler
- Win Rate: 55.7
Brawl Stars Afterpiece Arena Guide: Best Game Modes
Brawl Stars Afterpiece Arena offers a versatile battleground that adapts well to various game modes, each benefiting from the map’s unique layout and strategic opportunities. Whether it’s the central lane for dominant mid control in Gem Grab or the sneaky side-lane plays that shine in Bounty, the map provides distinct advantages across different modes. Here’s a breakdown of the best game modes for Brawl Stars Afterpiece Arena, highlighting their strengths and strategic considerations.

Gem Grab
The central lane makes this map ideal for Gem Grab, offering intense mid control and great flanking opportunities from the sides. Perfect for sharpshooters, tanks, and support roles alike.
- Suitability:

Bounty
Favors long-range control and sneaky side-lane plays.
- Suitability:
Knockout
Favors long-range control and sneaky side-lane plays.
- Suitability:
Brawl Stars Afterpiece Arena Guide: Strategy Tip
| Strategy Tip | Description |
|---|---|
| 📝 Control the Middle Early | Securing the middle lane early provides sightline control and pressure but requires rotating to side lanes to avoid flanks and maintain balance. |
| 📝 Use Bushes & Cover | Side-lane bushes are ideal for ambushes by assassins or tanks, while long-range brawlers must approach cautiously to avoid surprise attacks. Smart cover usage forces enemies into tough engagements. |
| 📝 Break Key Walls | Use wall-breaking Supers to open up sightlines for snipers or limit flanking routes. This forces enemies to reposition and opens opportunities for aggressive plays. |
| 📝 Target Long-Range Threats | Eliminating snipers like Piper or Brock early clears the way for tanks to advance, dominate chokepoints, and pressure objectives with minimal resistance. |
Brawl Stars Afterpiece Arena Guide: Conclusion
Brawl Stars Afterpiece Arena rewards a balanced mix of control and aggression. While early control of the middle lane applies pressure, successful teams rotate between lanes and adapt to shifting conditions. The map’s blend of open areas and tight corridors demands versatility, requiring teams to balance long-range and close-combat tactics. Effective use of gadgets, supers, and brawler strengths is essential, with adaptability being the key to maintaining control and outmaneuvering opponents throughout the match.
Frequently Asked Questions (F.A.Q)
📘 What is the best way to control the middle lane on Afterpiece Arena?
Controlling the middle early is crucial due to its wide sightlines and pressure potential. Use long-range brawlers to establish dominance, but don’t overcommit—rotate to side lanes regularly to avoid flanks. Holding the middle gives your team a strategic advantage, but only if supported by map awareness and team coordination.
📘 Which brawlers perform best on Afterpiece Arena?
Versatile brawlers that can handle both long-range duels and close-quarters skirmishes thrive here. Picks like Belle, Piper, and Brock work well in the open mid, while tanks like Ash or Rosa excel in side-lane ambushes. Choose brawlers based on team synergy and the need to rotate between zones fluidly.
📘 How important is flanking on this map?
Flanking is extremely effective, especially through the side corridors and bushes. Assassins or high-burst brawlers can sneak up on distracted opponents, disrupting their formation. Flanking also breaks up middle-lane dominance, keeping enemies on edge. Smart rotations into side lanes often decide close matches on Brawl Stars Afterpiece Arena.
📘 When should you use wall-breaking supers here?
Wall-breaking supers are most impactful mid-to-late game when opening the map benefits your team’s comp. Break mid-lane cover for long-range pressure or destroy side-lane walls to limit enemy ambushes. Use them reactively or to enable a push—timing is key to maximizing their strategic value.
📘 How should a team adapt when losing control of the center?
If you lose mid control, shift focus to side lanes to set up flanks or disrupt enemy momentum. Use bushes for cover, charge supers defensively, and wait for an opening. Coordinated side pressure can force the enemy to split up, giving your team the chance to retake the center.

