 Search
 Account
 Discord


- MadEvil Manor 01
- Dark Gray Block
- Orange Spike Block
- Spiked Roll Log Fence
- Cauldron
- Skull
- Bush
- Lava
- Indestructible Wall
Brawl Stars Abyssal Assault Guide: Introduction
Brawl Stars Abyssal Assault is structured into four key zones that shape tactical gameplay. Spawn zones offer moderate cover, enabling safe early positioning and ability charging, while encouraging quick transitions. The midfield is the central conflict area, filled with volatile skirmishes and shifting cover, favoring area control and ranged pressure. Side lanes are narrow and winding, ideal for isolated duels and flanks, benefiting brawlers with burst damage or vision tools. Lastly, the edges feature stealthy lower-ground paths suited for flanking or repositioning. Mastery of positioning, rotations, and timing across these areas is crucial to control the match.
Brawl Stars Abyssal Assault Guide: Map Layout
Brawl Stars Abyssal Assault is a dynamic map that offers a variety of tactical zones, each requiring different strategies to master. From the safe starting positions in the spawn zones to the intense skirmishes in the midfield, every part of the map plays a crucial role in determining the flow of battle. Understanding each area’s purpose and how to control it is key to securing victory. Here’s a breakdown of the map’s key areas and how to use them to your advantage:
| 🚩 Spawn Zones |
|---|
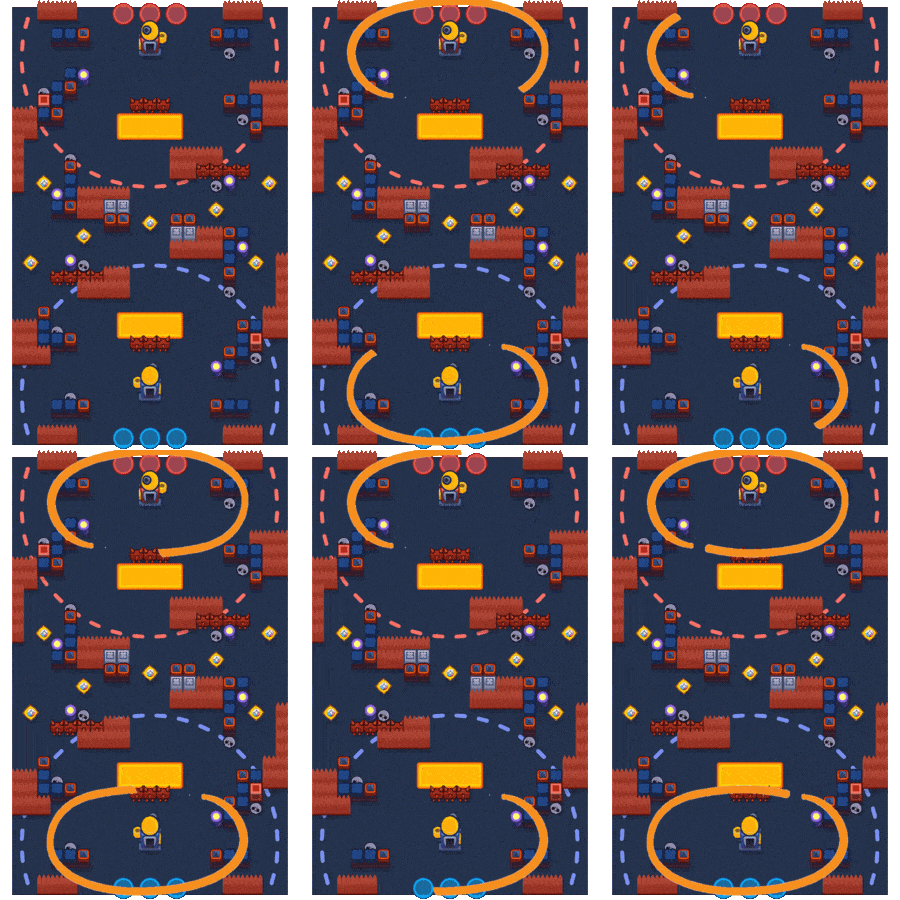 Each team’s spawn area provides moderate protection with scattered walls and bushes. These zones offer a safe start, allowing players to charge up abilities, plan pushes, or briefly regroup. While the cover reduces early-game pressure, the open gaps ensure that teams are still encouraged to advance quickly rather than camp. |
| ⚔️ Midfield |
|---|
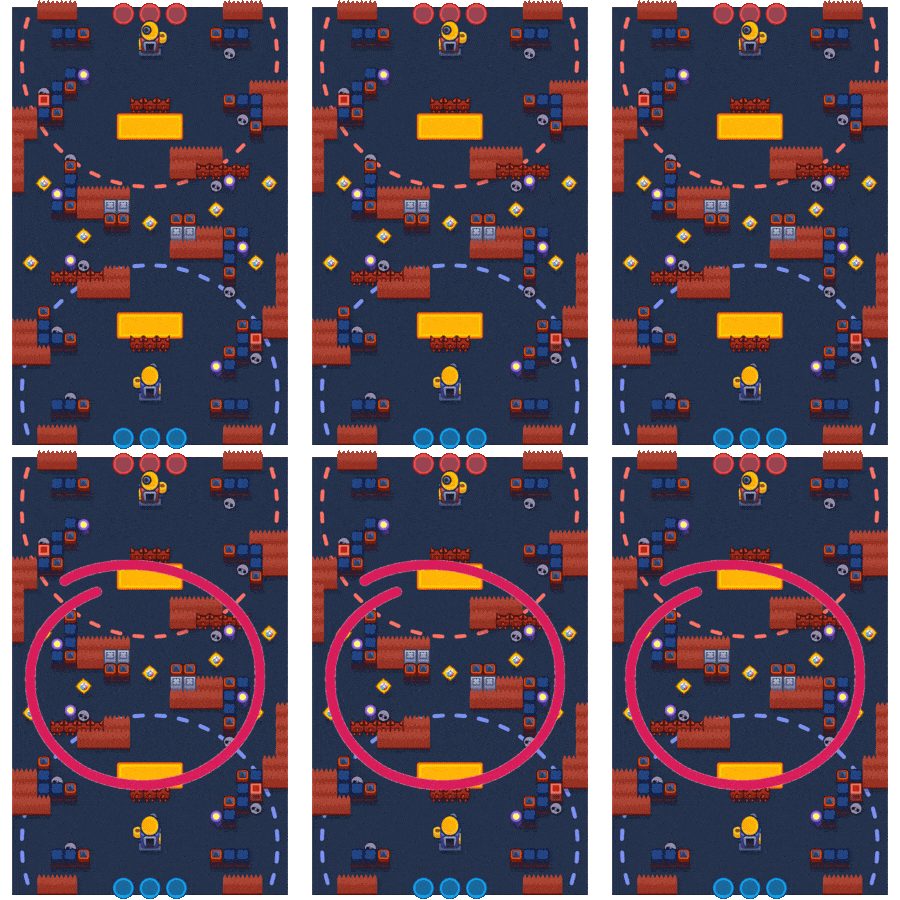 The central section of Abyssal Assault serves as the main battleground, where most of the action takes place. It features a dynamic layout of walls and bushes that offer temporary cover but no lasting safety. This zone is key to map control and heavily contested. Long-range brawlers and those with area denial excel here, while close-range fighters must coordinate well or use side routes to engage effectively. |
| 🔄 Side Lanes |
|---|
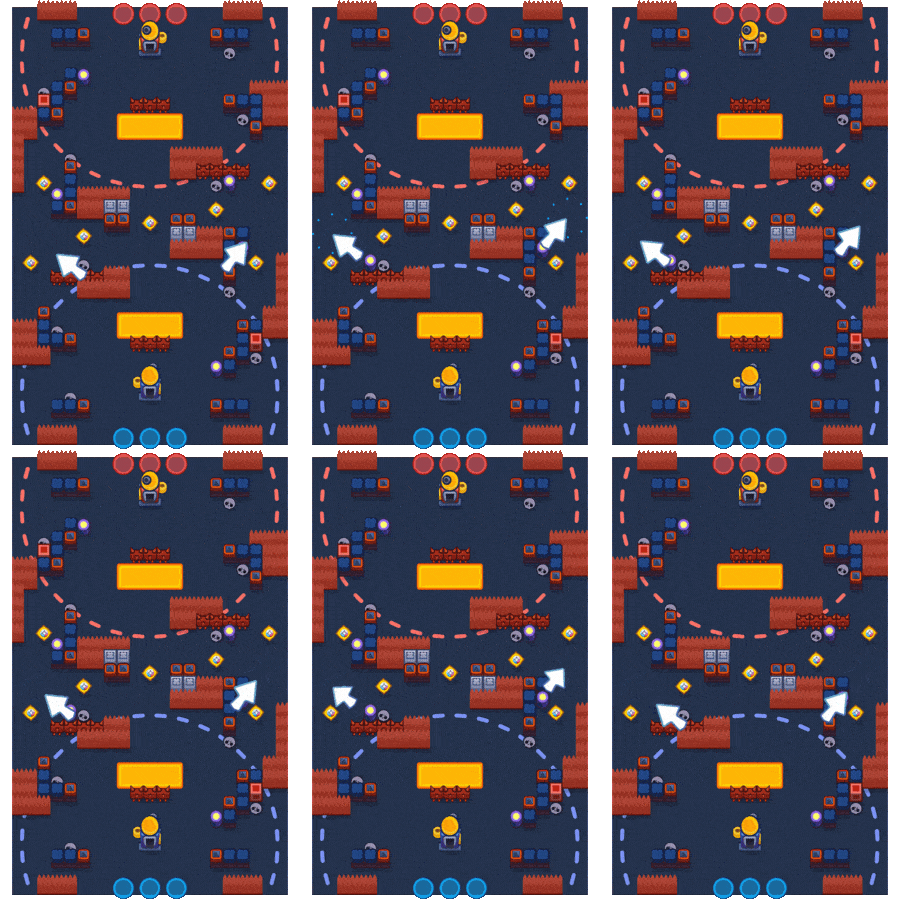 Running along the flanks of the map, the side lanes are narrower and more winding, creating ideal conditions for flanking or 1v1 duels. These paths reward brawlers with burst damage, crowd control, or vision abilities, especially those capable of punishing isolated enemies. Controlling these lanes lets teams collapse on the midfield from multiple angles and disrupt enemy rotations. |
Brawl Stars Abyssal Assault Guide: Best Brawlers
Certain brawlers shine on Brawl Stars Abyssal Assault thanks to their ability to control key zones, survive skirmishes, or execute effective flanks. Choosing the right composition can significantly boost your chances of winning, especially when roles are clearly defined and each brawler complements the map’s layout.

Buster
Durable initiator, disrupts enemy setups, pressures midfield
- Roles: Aggressive Frontliner
- Win Rate: 58%

Buzz
Fast initiations, strong stun for midfield control.
- Roles: Aggressive Frontliner
- Win Rate: 56%

Sam
High burst and zone-breaking power, thrives in chokepoints.
- Roles: Aggressive Frontliner
- Win Rate: 57%%

Lou
Freezing slows/stuns, excels in clustered areas like central bush.
- Roles: Control
- Win Rate: 60%

Penny
Long-range splash damage, turret punishes grouped enemies in bushes.
- Roles: Control
- Win Rate: 59%

Spike
Wide attack spread, perfect for zoning narrow lanes and bush-heavy areas
- Roles: Control
- Win Rate: 62%

Byron
Long-range heal and poke damage, supports from a safe distance
- Roles: Support
- Win Rate: 55%

Pam
Healing station anchors team in control zones, strong sustain
- Roles: Support
- Win Rate: 58%

Poco
Wide healing, great in grouped skirmishes around objectives.
- Roles: Support
- Win Rate: 54%

Max
Speed boost helps rotate quickly and pressure multiple zones
- Roles: Flanker
- Win Rate: 56%

Crow
Poison prevents healing, strong for softening enemies before engagements.
- Roles: Flanker
- Win Rate: 55%

Leon
Stealth enables surprise eliminations, ideal for bush play and backline access.
- Roles: Flanker
- Win Rate: 59%
Brawl Stars Abyssal Assault Guide: Best Game Modes
Brawl Stars Abyssal Assault’s layered layout—featuring contested midfield zones, bush-heavy flanks, and winding side lanes—makes it ideal for several competitive game modes like Gem Grab and Hot Zone. Its design rewards coordinated control, sharp positioning, and creative flanks, allowing various team strategies to thrive.

Gem Grab
Central bush cluster promotes constant mid control fights, rewarding teams that hold vision.
- Top Brawlers: Spike

Hot Zone
Multiple control points suit zoning brawlers; side lanes enable strategic flanks and support.
- Top Brawlers: Lou

Bounty
Long sightlines and bush-heavy flanks support stealth and pick-based plays, especially with Leon.
- Top Brawlers: Leon

Knockout
Midfield and tight corridors force smart engagements; flanks and ambushes are crucial.
- Top Brawlers: Buzz

Wipeout
Similar to Bounty, rewards controlled aggression and zone denial; good use of side paths matters.
- Top Brawlers: Crow
Brawl Stars Abyssal Assault Guide: Tips
| Tips | Strategy |
|---|---|
| ✨ Wall Bounce Techniques | Use throwers like Barley or Dynamike to bounce shots around corners and hit enemies hiding behind cover. This disrupts defensive setups and forces movement without direct exposure. |
| ✨ Gadget-Based Ambushes | Use gadgets near choke points to surprise enemies—e.g., Leon’s Clone Projector to bait shots, or Shelly’s Clay Pigeons to punish enemies hiding around corners. |
| ✨ Stealthy Lane Switching | Flank through wall gaps and narrow lanes to confuse enemy positioning. Combine with vision gadgets or team pushes for max pressure across multiple zones. |
| ✨ Super Timing for Zone Control | Save game-changing supers like Lou’s Blizzard or Penny’s Barrel to block off control zones late-game. This secures objectives and forces enemies into predictable paths. |
Brawl Stars Abyssal Assault Guide: Conclusion
Brawl Stars Abyssal Assault rewards teams that balance aggression, map control, and flanking strategies. The dynamic map encourages early pressure while securing key zones for long-term dominance. Coordinated team play and communication are essential for breaking defenses and holding contested areas, with synchronized rotations, gadget usage, and supers. Adapting playstyles to fit roles—aggressive frontliners, control brawlers, flanking brawlers, and support brawlers—creates a balanced team capable of handling the map’s unpredictability. Mastering the layout and adjusting tactics allows teams to outplay opponents, capitalize on mistakes, and secure objectives for controlled victories.
Frequently Asked Questions (F.A.Q)
💡 What are the key features of the Abyssal Assault map?
Brawl Stars Abyssal Assault features a dynamic layout with a central bush cluster, narrow side lanes, and multiple control zones. Its fragmented design encourages constant skirmishes and requires teams to balance aggression, map control, and flanking strategies to succeed.
💡 How can I control the central bush cluster effectively?
The central bush cluster is highly contested and offers strategic positioning and vision control. To dominate this area, use control brawlers with area denial abilities like Lou or Penny, while maintaining constant pressure with aggressive frontliners to keep enemies from securing the space.
💡 What is the best approach for flanking on this map?
Flanking on Brawl Stars Abyssal Assault involves utilizing narrow side lanes and wall gaps to surprise enemies. Brawlers like Leon, Max, and Crow can exploit these routes to bypass direct confrontations, catch isolated enemies off guard, and create pressure from multiple angles.
💡 Which brawlers excel in Abyssal Assault?
Aggressive frontline brawlers like Buster and Buzz excel at disrupting enemy defenses, while control brawlers like Spike and Penny dominate key zones. Support brawlers like Pam and Byron offer sustain, and flanking brawlers like Leon can exploit map gaps for ambushes.
💡 How important is team coordination in Abyssal Assault?
Team coordination is crucial in Brawl Stars Abyssal Assault. Synchronized rotations, gadget usage, and supers can make or break a match. Teams must communicate effectively to break enemy defenses, control contested zones, and adapt to the constantly shifting battlefield.

