 Search
 Account
 Discord

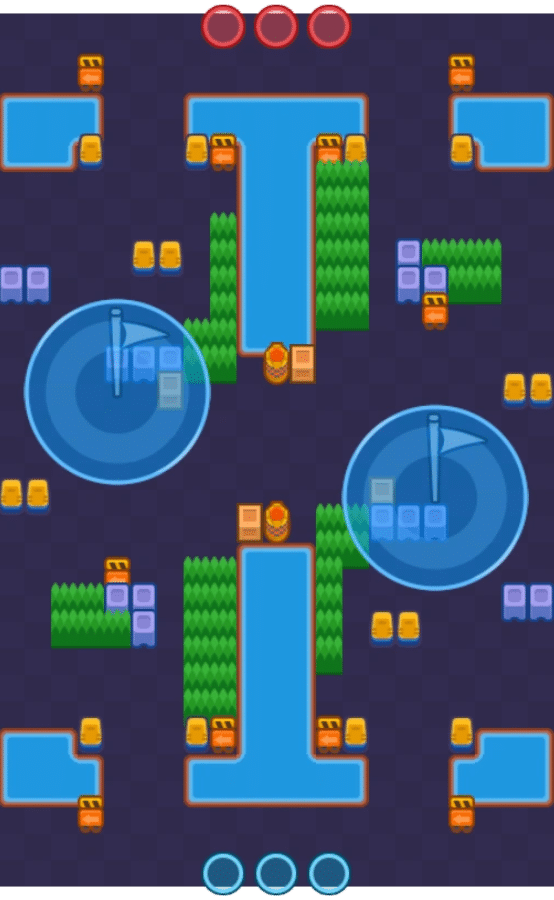

- Arcade 01
- Arcade 02
- Wooden Box – 4
- Road Barrel – 2
- Road Arrow Sign – 10
- Bush – 50
- Lake – 6
Brawl Stars Control Grande Guide: Introduction
The Brawl Stars Control Grande map presents a dynamic and multifaceted environment that requires players to think critically and adjust their strategies on the fly. It’s a battleground where success hinges on more than just individual skill; a deep understanding of the map’s layout and how to leverage its features is crucial. The map is designed with a variety of features that create opportunities for both aggressive and defensive playstyles, catering to a broad range of brawlers and tactics.
At the core of this Brawl Stars Control Grande map is the balance between open spaces and obstacles. The open spaces in the central area of the map provide an arena for long-range battles and mobility. However, these expanses can also be dangerous, leaving players exposed and vulnerable to enemies with higher burst damage or better mobility. On the other hand, obstacles like walls, bushes, and natural barriers create opportunities for players to control their positioning and surprise enemies, making the map ideal for stealth tactics and ambushes.
The Brawl Stars Control Grande map also contains several strategic hotspots that are critical for controlling the flow of the match. These include high ground positions that offer superior sight lines, allowing players to scout enemy movements and take advantage of ranged attacks from an elevated position. Additionally, chokepoints and narrow pathways serve as key areas where players can block enemy advances or set traps, forcing opponents into vulnerable positions.
The interplay of these features means that there is no one-size-fits-all approach to the Brawl Stars Control Grande map. A successful strategy requires both aggressive and defensive tactics. Aggressive players may want to control the open areas and pressure the enemy team, while defensive players might focus on holding key chokepoints and using the cover provided by obstacles to maintain their position. The map rewards those who can adapt their strategies, think ahead, and work in tandem with teammates to outsmart and outmaneuver their opponents.
Brawl Stars Control Grande Guide: Map Layout
The Brawl Stars Control Grande map centers around a key control point (CP) in the middle, where players compete to capture or defend a large interactive terminal. The surrounding area is open, with plenty of cover like barrels and crates, but there are also elevated platforms offering strategic sightlines. This central area serves as the focal point for map control, requiring teams to work together to hold or contest the objective.
To the north, the Bunker Complex features of Brawl Stars Control Grande tight hallways and rooms, perfect for close-quarters combat. Sniper positions offer views of the central area, allowing for long-range support. Meanwhile, the southern Industrial Zone is an open, obstacle-filled environment with large machines and conveyor belts. This section encourages fast-paced combat, requiring players to navigate through cover while attempting to control key areas.
The Utility Corridor on the east side provides narrow passageways and elevated paths, offering opportunities for stealthy movement and higher ground attacks. This section connects to the central control point, allowing players to reach it quickly and engage from different angles. On the west side, the Tech Lab features high-tech environments and interactive terminals. Players can use the tech equipment to disable enemy systems or gain temporary advantages, making this area crucial for tactical control.
The Brawl Stars Control Grande map also includes Overhead Catwalks, offering players vertical combat opportunities, and Underground Tunnels, which provide hidden routes for flanking or avoiding direct conflict. With strategic spawn areas located at the map’s corners, players are positioned far enough from key combat zones to plan their approach. The overall design encourages both close-quarters and long-range combat, offering diverse opportunities for team coordination and dynamic gameplay.
Brawl Stars Control Grande Guide: Choosing the Right Brawlers
Selecting the right brawler for the Brawl Stars Control Grande map is critical for executing your strategy successfully. Different brawlers excel in different areas of the map, and understanding the terrain and objective areas will help you make the best choice. The Grande map has a combination of open spaces, tight corridors, and verticality, so picking the right brawler for these environments can give your team a significant advantage.
Ranged Brawlers: Long-Range Advantage
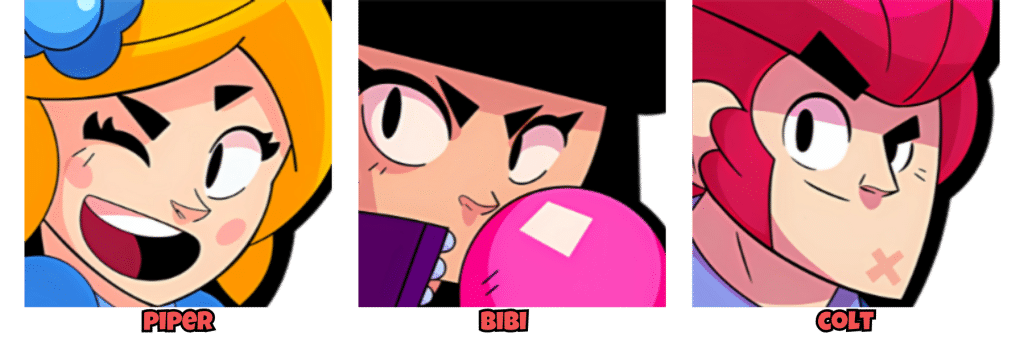
Ranged brawlers like Piper, Bibi, or Colt are highly effective on the Brawl Stars Control Grande map, especially due to the open spaces in the center. These brawlers can deal significant damage from a distance, taking advantage of sightlines from elevated platforms or long corridors. Their ability to deal damage without getting exposed makes them valuable in holding the central control point and picking off enemies from afar. Ranged brawlers can also take up positions on the overhead catwalks or from behind cover, providing a substantial threat to the opposing team while staying relatively safe.
Tank Brawlers: Frontline Power

Tank brawlers like El Primo, Frank, or Bull are perfect for taking on more defensive or aggressive roles. Due to the open areas and choke points, tanks can charge in and clear paths for the rest of the team. Their high health pools allow them to absorb damage and push through difficult areas, especially in the more confined spaces of the Bunker Complex or the Tech Lab. Tanks can engage in direct combat, take control of critical positions, and provide a frontline for your team, allowing ranged or support brawlers to focus on dealing damage from behind.
Control Brawlers: Mastering Space

Control brawlers like Barley, Tara, and Sprout excel in the Brawl Stars Control Grande map due to their area-of-effect (AoE) attacks and crowd control abilities. These brawlers can control key areas, block enemy movement, and force enemies into unfavorable positions. The Grande map’s layout, with its multiple levels and tight spaces, is perfect for brawlers who can dictate the flow of the game by controlling zones. For example, Barley can throw bombs into tight corners in the Utility Corridor, while Tara can use her Super to stun and control enemies in high-traffic areas like the central control point. These brawlers are excellent at disrupting enemy formations and creating opportunities for teammates.
Healers and Support Brawlers: Sustaining the Team

Healers and support brawlers like Pam, Emz, and Gene play a crucial role on the Brawl Stars Control Grande map, where battles can be intense and chaotic. These brawlers provide sustain for their team, ensuring that tanks, control brawlers, and ranged attackers can stay alive longer. Pam can heal teammates in the heat of battle, especially around the central control point or in more cramped areas like the Bunker Complex. Emz can provide area damage while healing herself and her teammates, making her ideal for controlling the Industrial Zone or the Tech Lab. Gene offers versatility with his ability to pull enemies into unfavorable positions, making him a great choice for controlling choke points or for supporting aggressive pushes.
By selecting the right mix of brawlers, your team can take advantage of the diverse environments on the Brawl Stars Control Grande map, from open spaces to tight, vertical zones. Each brawler type has a specific role to play, and understanding how to balance these roles will be key to securing victory on this dynamic map.
Brawl Stars Control Grande Guide: Game Modes
The Brawl Stars Control Grande map offers a variety of game modes that leverage its intricate design, offering different strategic opportunities and challenges for players. Each mode takes advantage of the map’s unique features, from its open spaces to its narrow corridors and elevated platforms, requiring teams to adapt their strategies based on the objectives at hand.
Brawl Ball: Control and Mobility

In Brawl Ball, the emphasis is on mobility, positioning, and quick decision-making. The central control point and surrounding areas serve as critical battlegrounds where teams must contest possession of the ball while managing both defensive and offensive roles. With open spaces and choke points, the map offers opportunities for strategic flanking and positioning. To dominate, it’s essential to control both the center and the side lanes. Players should coordinate to push the ball towards the goal while also managing their defensive positions to prevent the opposing team from scoring.
Heist: Protecting and Attacking the Safe

In Heist, the focus shifts to protecting or attacking the safes located at each team’s base. Players must control key areas of the map to gain access to the enemy’s safe while keeping their own safe well-defended. The Brawl Stars Control Grande map’s blend of open sightlines and tight corridors makes choke points especially important. Teams can use these areas to block enemy advances or execute surprise attacks. Timing and coordination are essential, as pushing too aggressively without backup can leave your team vulnerable to counterattacks, while a strong defense can prevent the enemy from reaching your safe and dealing damage.
Siege: Gathering Bolts and Controlling the Center

In Siege, the goal is to gather bolts from various parts of the map to spawn a powerful siege robot. The central control point is pivotal, and securing it first can provide a significant advantage in terms of robot strength. The narrow passageways and elevated positions on the Brawl Stars Control Grande map offer opportunities to control enemy movement and set up powerful ambushes. Teams must balance between gathering bolts, defending their territory, and planning coordinated attacks to overpower the enemy team’s robot. Effective map control during this mode often comes down to who can maintain dominance over key areas while preventing enemy brawlers from stealing bolts or disrupting their siege efforts.
Hot Zone: Dominating Key Areas
In Hot Zone, the objective is to capture and hold specific areas of the map, earning points by controlling these zones. The Brawl Stars Control Grande map offers intense skirmishes, with the central area and elevated platforms being key positions to contest. As the match progresses, controlling these zones becomes harder, with both teams pushing aggressively. Teams must coordinate to secure and defend the Hot Zones, balancing offense and defense to outlast the enemy. The map’s mix of open spaces and tight corridors requires careful positioning and teamwork to maintain control.
Brawl Stars Control Grande Guide: Winning Strategies
The Brawl Stars Control Grande map offers a dynamic environment where map control, positioning, and teamwork are crucial for success. With a mix of open spaces, narrow corridors, and verticality, each phase of the match requires a different approach. Whether you’re securing early positions, holding off the enemy in the mid-game, or closing the match with a final push, mastering the flow of the game will give you a significant advantage.
Early Game: Securing Control of Key Areas
The early stages of the match are all about establishing Brawl Stars Control Grande map control. Right from the start, prioritize areas with high ground or natural cover, especially for ranged and support brawlers who benefit from elevated positions. Avoid pushing too far without backup—focus on securing key positions rather than taking unnecessary risks. If playing in modes like Showdown, prioritize gathering power cubes safely, with mobile brawlers like Mortis or Leon excelling at this task. Bushes are key for sneaky ambushes, especially if you have ranged brawlers on your team who can use them to hide and attack enemies trying to control the central area.
Mid-Game: Engaging the Enemy and Maintaining Map Control
As the match progresses, controlling choke points on Brawl Stars Control Grande becomes essential. Tank or control brawlers should position themselves in narrow passages to limit enemy movement and prevent flanking. Team coordination is vital—support your tanks and damage dealers by healing or controlling space with brawler abilities. Keep your ranged brawlers behind the frontlines, dealing damage while tanks push forward. If the enemy groups together at key points, counter them by sending in a brawler who can disrupt their formation. Using supers effectively can turn the tide—Tara’s super, for example, can catch multiple enemies, giving your team a perfect opening to strike.
Late-Game: Closing the Match
In the late game, every move counts. The Brawl Stars Control Grande map has shrunk, and players are more aggressive, so using supers strategically is crucial. Coordinate your team’s ultimates to wipe out opponents or create game-changing openings. If objectives like Brawl Ball or Heist are in play, focus on pushing the objective, not just engaging in combat. Position your team aggressively and make coordinated pushes. As the play area shrinks further, ensure your team controls critical zones and is aware of potential enemy flanks. Anticipate enemy strategies, such as focusing all attacks on a single brawler, and use counter tactics to gain the upper hand.
By following this strategic flow, your team can maintain control of key areas, adapt to the match’s progress, and capitalize on enemy weaknesses. Proper positioning, brawler selection, and timing are essential for disrupting the enemy while executing coordinated pushes. Whether focusing on objectives like Brawl Ball or defending zones in Hot Zone, maintaining dominance will maximize your chances of victory, ensuring your team outplays the opposition at every stage.
Brawl Stars Control Grande Guide: Conclusion
Mastering the Brawl Stars Control Grande map is not just about raw skill—it requires a strategic mindset, quick thinking, and a deep understanding of the map’s layout and how different brawlers interact with it. The map’s unique features, including open spaces, choke points, and elevated platforms, create both opportunities and challenges that can be leveraged in your favor if approached correctly. By selecting the right brawlers for each phase of the game and adapting your tactics as the match progresses, you can gain a significant advantage over your opponents.
Key to mastering this Brawl Stars Control Grande map is understanding how the game modes play out in this specific environment. Whether you’re pushing for control of the central area in Brawl Ball, defending or attacking the safe in Heist, or gathering bolts in Siege, the layout offers plenty of opportunities to outsmart and outmaneuver the enemy team. Moreover, recognizing the strengths and weaknesses of the map’s terrain allows you to position yourself and your team for maximum effectiveness, taking advantage of the terrain for both offense and defense.
Choosing the right brawlers for each role—ranged, tank, control, or support—is essential for success. Ranged brawlers can dominate from a distance, tanks can control key positions, and support brawlers can keep your team alive during tough moments. The key is to ensure that your team has a good balance to handle any situation the match throws your way. Communication and coordination with your team are also vital; a well-synced group can overcome even the toughest opponents, no matter how challenging the map or the situation may seem.
Ultimately, mastering the Brawl Stars Control Grande map requires a combination of preparation, adaptability, and teamwork. By practicing these strategies and continuously refining your approach, you can consistently outplay opponents and control the battlefield. Remember, the key to victory is not just individual skill but also working together as a team to outmaneuver and outsmart the enemy at every turn. With time, patience, and a keen understanding of the map, you’ll be able to dominate the Grande and leave your opponents in the dust.

