 Search
 Account
 Discord


- Slugfest 01
- Slugfest 02
- Slugfest 03
- Slugfest 04
- Slugfest 05
- Slugfest 06
- Slugfest 07
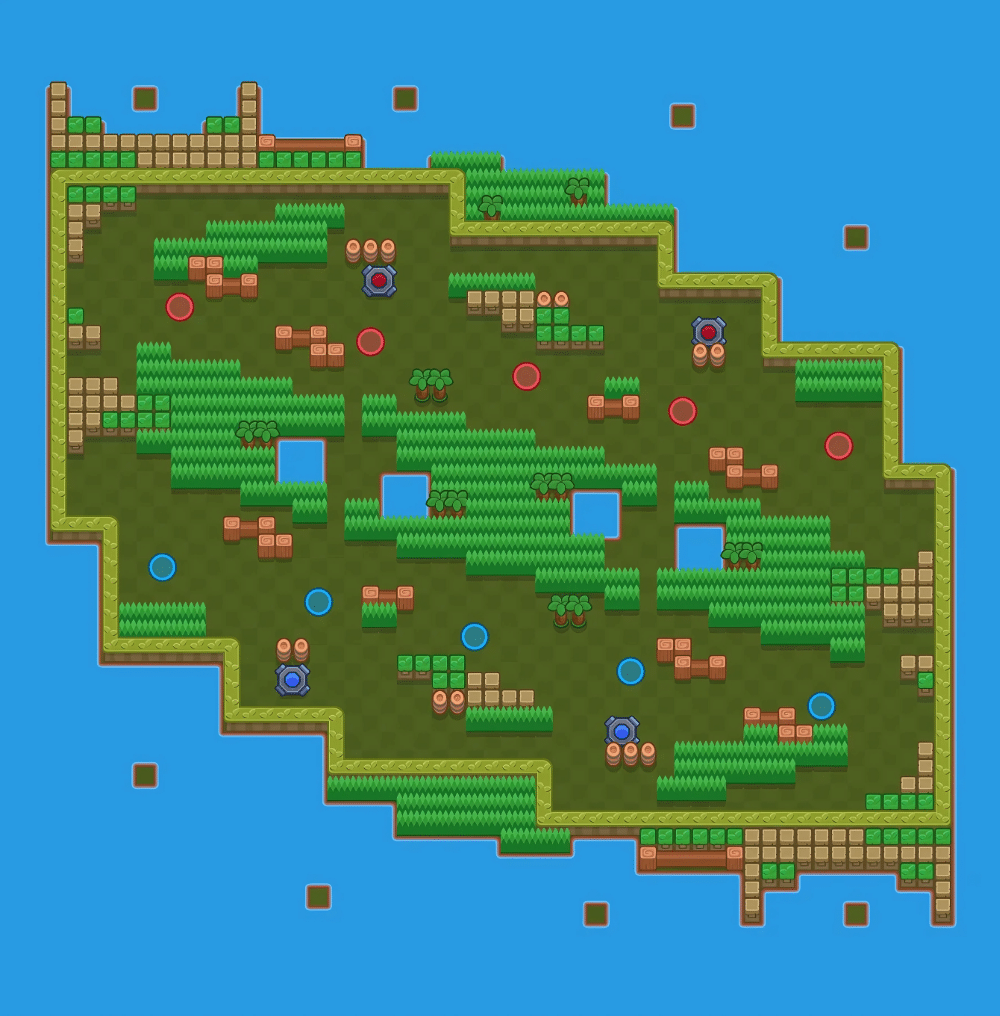
Brawl Stars The Emptiness Machine is a community-created map featured in the Knockout 5v5 event. Known for its creative layout and fan-designed structure, this map offers a fresh tactical challenge where teams must eliminate all opponents in each round without respawns. Its design encourages both aggressive plays and strategic positioning, making it important for players to choose Brawlers that excel in both survivability and burst damage.
Brawl Stars The Emptiness Machine Guide: Map Layout
Brawl Stars The Emptiness Machine is a close-quarters Knockout arena filled with corridors, ambush lanes, and strategic cover. Its symmetrical and maze-like structure rewards tactical rotations, map control, and elimination-focused team play.
| Central Safe Zone & Surroundings |
|---|
 The center area is likely open or lightly covered, representing the main arena where teams engage—fitting for the Last Stand-style elimination setup. |
| Maze-Like Pathways & Cover |
|---|
 The map features tight corridors, block structures, and staggered walls that demand tactical control and positioning. |
| Peripheral Areas & Bush Cover |
|---|
 Around the edges are several clusters of bushes and small walls, useful for sneaking and staging surprise attacks on opponents pushing through mid paths. |
Brawl Stars The Emptiness Machine Guide: Best Brawlers
| Brawler | Role | Strength |
|---|---|---|
 Fang | Assassin and Close-Range Finisher | The tight corridors make it easy for Fang to close gaps and chain eliminations with his Super. |
 Bibi | Tank and Zone Control | Bibi’s knockback and mobility allow her to control chokepoints and force enemies back in narrow paths. |
 Rico | Long-Range Control with Bounce Shots | The many walls and corners let Rico bounce shots effectively, giving him strong area control and chip damage potential. |
 Spike | Area Denial and Burst Damage | Spike’s attacks can cover tight corridors and choke points, making it hard for enemies to push safely. |
 Shelly | Close-Range Burst and Anti-Tank | Shelly excels in short-range fights, punishing over-aggressive enemies hiding behind walls. |
 Bea | Long-Range Damage Dealer | Bea’s range and burst potential allow her to poke from a distance and finish off low-health enemies retreating through open lanes. |
 Stu | Mobility and Hit-and-Run Tactics | Stu’s Super lets him dash around corners quickly, making him great for quick picks and escapes in this map’s tight layout. |
 Gus | Support and Sustain | Gus provides team shielding and safe poke damage while helping allies survive longer during elimination rounds. |
Brawl Stars The Emptiness Machine Guide: Tips
Brawl Stars The Emptiness Machine Machine is a tight and fast-paced Knockout map where positioning, timing, and Brawler choice are key to survival. With its maze-like layout and narrow corridors, the map rewards players who can control choke points, surprise enemies from behind cover, and make quick, decisive plays. Here are some useful tips to help your team gain the upper hand in each round.
Take Advantage of Tight Corridors
The map’s narrow lanes and maze-like layout make close-range Brawlers like Fang, Bibi, and Shelly highly effective. Use the walls and corners to ambush enemies and control key choke points.
Use Bounce Shots to Control Space
Brawlers like Rico excel here thanks to the abundance of walls and tight angles. Take advantage of bounce shots to hit enemies hiding behind cover and force them into the open.
Maintain Long-Range Pressure
Even with tight corridors, long-range Brawlers like Bea and Spike can control open sections and punish enemies trying to rotate between lanes. Use their range to poke and finish off low-health targets.
Focus on Mobility and Quick Engagements
Brawlers like Stu thrive on this map by using mobility to dodge attacks and reposition quickly. Fast movement is key for hit-and-run tactics and staying alive in elimination rounds.
Watch for Flanks and Side Pushes
The map’s side paths allow sneaky flanks. Always check the bushes and side lanes to avoid being caught off guard by assassins or tanks trying to close the distance.
Brawl Stars The Emptiness Machine Guide: Conclusion
Brawl Stars The Emptiness Machine map offers a fast-paced and tactical Knockout experience where positioning and quick decision-making are crucial. Its maze-like corridors and tight spaces favor close-range brawlers, mobility-focused fighters, and those who can control choke points with area damage or bounce shots. Success on this map comes from smart movement, careful lane control, and predicting enemy flanks. Whether you play aggressively or defensively, adapting your strategy to the map’s layout will greatly increase your chances of victory.
Frequently Asked Questions (F.A.Q)
❓What event is The Emptiness Machine map used for?
Brawl Stars The Emptiness Machine is a community-designed map featured in the Knockout 5v5 event.
❓What is the main objective on this map?
The goal is to eliminate the entire enemy team each round. There are no respawns, so once you’re defeated, you stay out until the next round begins.
❓How important is map awareness on this map?
Extremely important. The maze-like design allows for easy flanks and surprise attacks. Always watch side lanes and bushes to avoid ambushes.
❓Should I play aggressively or defensively?
It depends on your Brawler choice. Tanks and assassins thrive on aggressive pushes through the corridors, while ranged or control Brawlers do better holding positions and punishing overextensions.
❓Is mobility a big advantage here?
Yes. Brawlers like Stu and Fang with high mobility can quickly reposition, escape dangerous situations, and capitalize on openings in the enemy’s defense.

