 Search
 Account
 Discord


- Slugfest 01
- Slugfest 02
- Slugfest 03
- Slugfest 04
- Slugfest 05
- Slugfest 06
- Slugfest 07
- Stone Block -590
- Wooden Box – 69
- Wooden Barrel – 25
- Wooden Fence -14
- Rope Fence – 17
- Skull – 4
- Lake – 81
- Power Cube Box – 25
Brawl Stars The Galaxy is a community-created map featured in the Showdown event. Known for its open spaces mixed with scattered cover, this map challenges players to balance long-range engagements with careful positioning behind obstacles. Its fan-designed layout offers a fresh take on survival-focused gameplay, where players must outlast opponents while managing power-up control and avoiding ambushes from different angles.
Brawl Stars The Galaxy Guide: Map Layout
Unlike many other maps, Brawl Stars The Galaxy has no perfect symmetry. The irregular placement of cover and obstacles forces players to constantly adjust their movement and battle strategies based on their spawn location and current position on the map.
| Central Area |
|---|
 At the very center of the Brawl Stars The Galaxy map, players will find two small bushes surrounded by ropes, making it a small but crucial spot for early skirmishes and power-up control. |
| Spiral Structure |
|---|
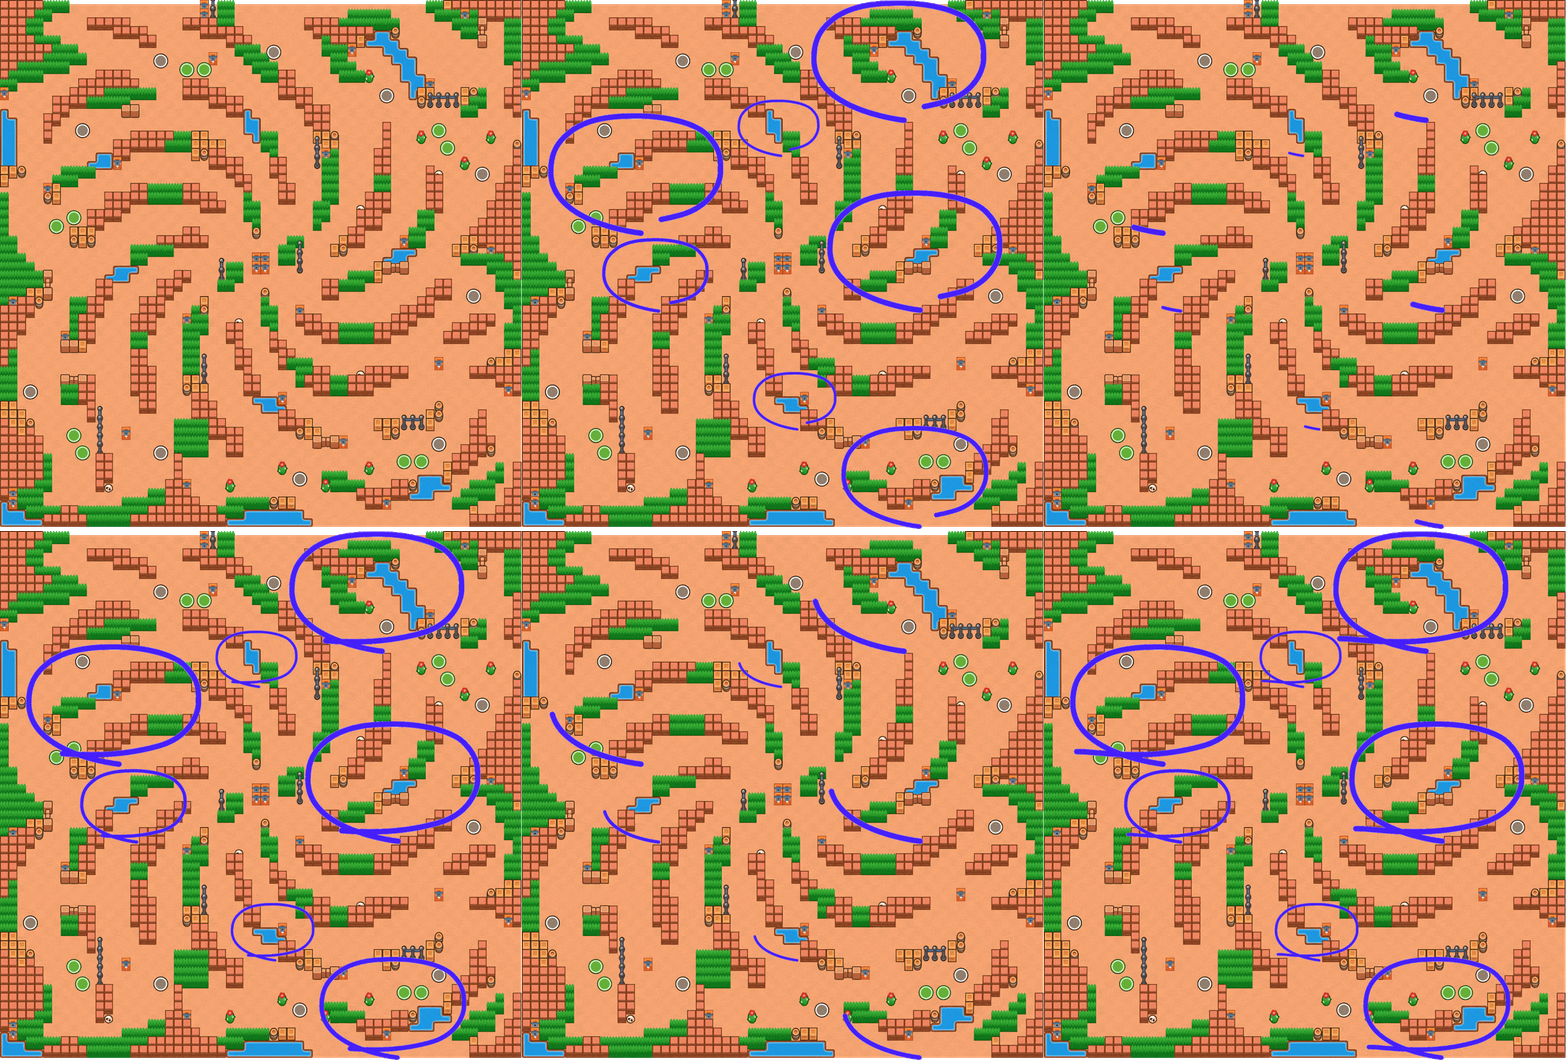 Radiating outward from the center are 12 distinct clusters consisting of walls, bushes, and small lakes. These clusters are curved clockwise, forming a spiral pattern that resembles a spinning tornado. This layout naturally draws players toward the center while still offering multiple ambush points and pathways. |
| Border Design |
|---|
 The outer edges of the Brawl Stars The Galaxy map feature a combination of walls, bushes, ropes, and lakes, giving players cover options and places to rotate safely or set up ambushes. These borders create natural choke points and hiding spots for players trying to avoid early fights. |
Brawl Stars The Galaxy Guide: Best Brawlers
| Brawler | Role | Strength |
|---|---|---|
 Spike | Area Control and Chip Damage | Spike’s spread attack works well for controlling both tight spaces and open areas around the spiral paths. |
 Leon | Stealth and Ambush | With the many bushes and irregular angles, Leon can sneak around and ambush enemies, especially from the outer walls or mid-bushes. |
 Crow | Poison and Chip Pressure | Crow can safely chip enemies from range while using his mobility to escape tight spiral zones and avoid getting cornered. |
 Edgar | Mobility and Cleanup | Edgar’s jump allows him to leap over walls and lakes for quick escapes or sudden engages, making him great for late-game ambushes. |
 Bibi | Close-Range Control | Bibi’s knockback and speed help her control tight paths and win face-to-face fights inside the clustered spiral areas. |
 Surge | Scaling Power and Versatility | Surge can take advantage of open spaces for range and use teleportation and speed upgrades to maneuver around the spiral. |
 Rosa | Tank and Bush Control | Rosa’s ability to hide and fight in bushes makes her very effective for controlling the mid and outer bush clusters near the borders. |
 Stu | Mobility and Hit-and-Run | Stu’s Super allows him to quickly dash through walls and lakes, giving him strong repositioning power in the maze-like spiral layout. |
Brawl Stars The Galaxy Guide: Tips
Brawl Stars The Galaxy map in Showdown presents a unique mix of open spaces, spiral structures, and dense wall clusters. Its unusual layout creates opportunities for both long-range and close-range engagements, making Brawler selection and positioning crucial. Whether you’re playing solo or duo, understanding how to control the map’s key areas while adapting to enemy picks is essential for survival and victory.
Take Advantage of Throwers
Throwers like Barley, Grom, Sprout, Tick, Larry & Lawrie, and Dynamike are strong on this map due to the many walls for safe attacks. However, always check nearby bushes to avoid surprise ambushes.
Control the Center for Power Cubes
The center area contains the most Power Cubes, making it a high-risk, high-reward zone. Tanky Brawlers like Jacky, Bibi, Frank, El Primo, and Rosa are best for contesting this space thanks to their durability.
Duo Strategy: Pair a Marksman with a Thrower
In Duo Showdown, it’s effective to combine a long-range Marksman like Piper, Bea, Mandy, Belle, or Colt with a Thrower like Tick. This duo covers both open areas and safe damage from behind walls.
Utilize Tick’s Gadget for Center Control
Tick’s Last Hurrah Gadget can push enemies away from the center while also dealing damage to boxes, helping your team secure early Power Cubes safely.
Maximize Long-Range Brawlers’ Potential
Bea, Brock, Colt, Mandy, and Piper can poke from a distance. Bea’s Honey Comb Star Power and Rattled Hive Gadget are great for both survival and bush checking. Piper’s Ambush Star Power gives bonus damage from bushes, perfect for this map.
Use Edgar for Quick Kills and Escapes
Edgar’s Super lets him jump on weak enemies and escape tight situations. His burst damage and mobility make him a strong assassin on this map.
Lou for Freezing and Zone Control
Lou’s Super can freeze enemies and force them into walls, making it easier to escape or land follow-up shots. His ability to control choke points is valuable on this wall-heavy map.
Sprout for Path Blocking
Sprout’s walls can block enemy routes and protect your team. Use the Transplant Gadget for multiple wall placements. Sprout is safer to play in Duo to avoid getting caught in close-range fights.
Mr. P’s Porters for Distraction and Damage
Mr. P can chip away at enemies using splash damage and cover tight paths with porters. Use the Revolving Door Star Power for added pressure, as Handle With Care is less effective here due to all the walls.
Consider Assassin Brawlers for Anti-Thrower Tactics
Mortis, Crow, Leon, and Mico can be good counters to the many throwers often picked on this map. Their mobility and burst damage help take out throwers hiding behind cover.
Brawl Stars The Galaxy Guide: Conclusion
Brawl Stars The Galaxy map challenges players with its spiral layout, dense cover, and unpredictable engagement zones. Success here depends on smart positioning, effective use of walls for cover or thrower attacks, and knowing when to engage or retreat. Whether you choose to control the center for Power Cubes or play around the outer edges with ranged or ambush Brawlers, adapting your strategy to the map’s unique design will greatly increase your chances of securing a win.
Frequently Asked Questions (F.A.Q)
❓What event is The Galaxy map used for?
Brawl Stars The Galaxy is a community-designed map featured in the Showdown event in Brawl Stars.
❓What is the main feature of Brawl Stars The Galaxy map’s layout?
The map has a unique spiral layout, with clusters of walls, bushes, and lakes curving clockwise around the center, making it look like a spinning tornado.
❓Is controlling the center important?
Yes. The center holds the most Power Cubes, making it a high-reward area, but it’s also heavily contested and dangerous, especially at the start of the match.
❓How can I counter Throwers on Brawl Stars The Galaxy map?
Use assassin Brawlers with good mobility or long-range Brawlers that can poke throwers from a safe distance. Stay out of choke points and approach from unexpected angles.

